The ultimate Supabase self-hosting Guide

Preamble: This guide is not intended for local / dev installation. Supabase already has a dev setup with the CLI - so use that one. This guide is for actual self-hosting and it's quite some honest work, definitely worth it.
If you don't wanna spend any money you can use my DigitalOcean Link - which gives you 200$ of Free Credit for 60 days, enough to do anything.
The standard self-hosting Guide from Supabase, as of this moment (August 2023) cannot be used for production deployments. It is insecure but it's gonna be the pathway for a proper setup.
The concept and the realization of this took me multiple days. Actually, there is a YouTube Video for you to follow up:
The reason why I am also making it a blog article is simple: The blog article is technical foundation of my YouTube Video and allows you and me to easily copy config data.
1. Setting up Storage (beyond Amazon S3)
Yup, this should be your first move. Simply because changing this afterwards is a Pain in the A**. And the best part: You don't have to decide, you can just leave it as is (1.1)
Option 1: Volume Storage 👉🏾 You probably don't need S3
Supabase-as-a-Service (supabase.com) is using S3 Storage. What that is? Well, basically an API that allows storage of files on a server and that server can replicate and backup those files (that's the short version).
Now everybody goes "Yeah, backups and stuff and scaling, I need that". Nobody said you don't get that without S3. If you are using a Server from e.g. Hetzner Cloud then you can simply choose their Volumes for file storage and activate backups. The same goes for providers such as DigitalOcean. So basically you're all set with normal file storage as well.
In fact: Simply using standard volumes will probably be faster than adding another remote layer with S3, but just saying.
Option 2: S3 Storage 👉🏾 Self-Hosted minio
This approach works the same way for all S3 compatible storages, in my case, I just want to show you how easy it is to create one that is self-hosted. Surely, you can use AWS S3 as well.
Create a new Server (we will call it supa-storage for now) on the Provider of your choice (mine -> Hetzner Cloud) with Docker. Most Providers have Servers with Docker preinstalled. If not, simply go with Ubuntu and install Docker (I won't cover the installation of Docker).
Step 1: Create a docker-compose.yml file as follows
version: '3.8'
services:
  minio:
    image: quay.io/minio/minio
    container_name: minio
    volumes:
      - ./minio-data:/data
    environment:
      MINIO_ROOT_USER: your_root_user
      MINIO_ROOT_PASSWORD: your_root_password
      MINIO_SERVER_URL: https://storage.yourdomain.com
    command: server /data --console-address ":9090"
  nginx:
    image: 'jc21/nginx-proxy-manager:latest'
    restart: unless-stopped
    ports:
      - '80:80'
      - '81:81'
      - '443:443'
    volumes:
      - ./nginx-data:/data
      - ./nginx-letsencrypt:/etc/letsencrypt
Run it
docker compose up -d
Manage nginx
Now wait until the containers are started. Once everything is started you will want to open http://your-server-ip:81 in your browser. This will open a login window to the nginx proxy manager also called npm (but has nothing to do with npmjs ✌️). You login with admin@example.com and changeme. Once you are logged in you are asked for new credentials, use whatever you want.
The first thing we want to do now is self-protect the proxy manager. Go to Proxy Hosts and click to add a new one. Now, again, you'll need a subdomain to do that: Like proxy.your-domain.com which points to your server.
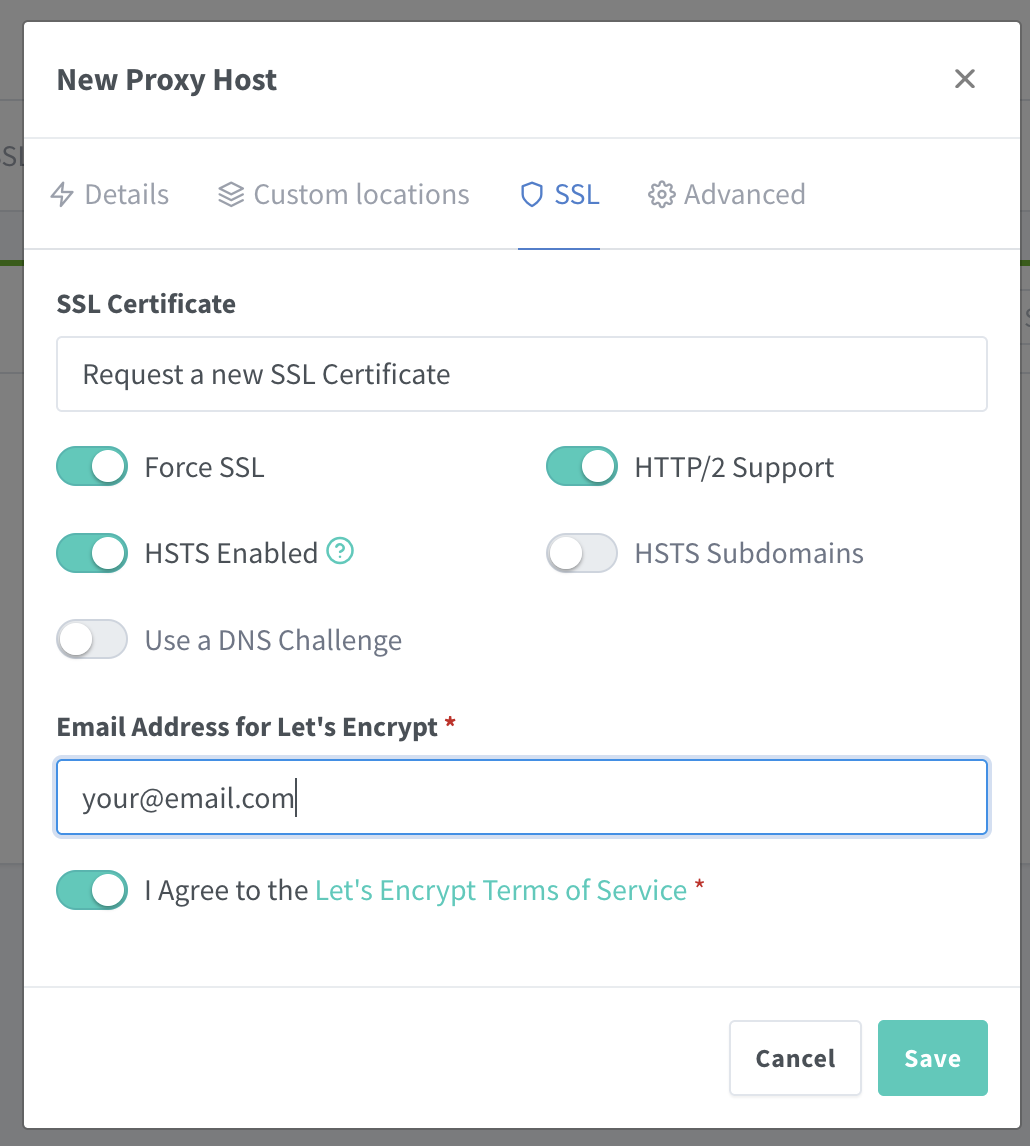
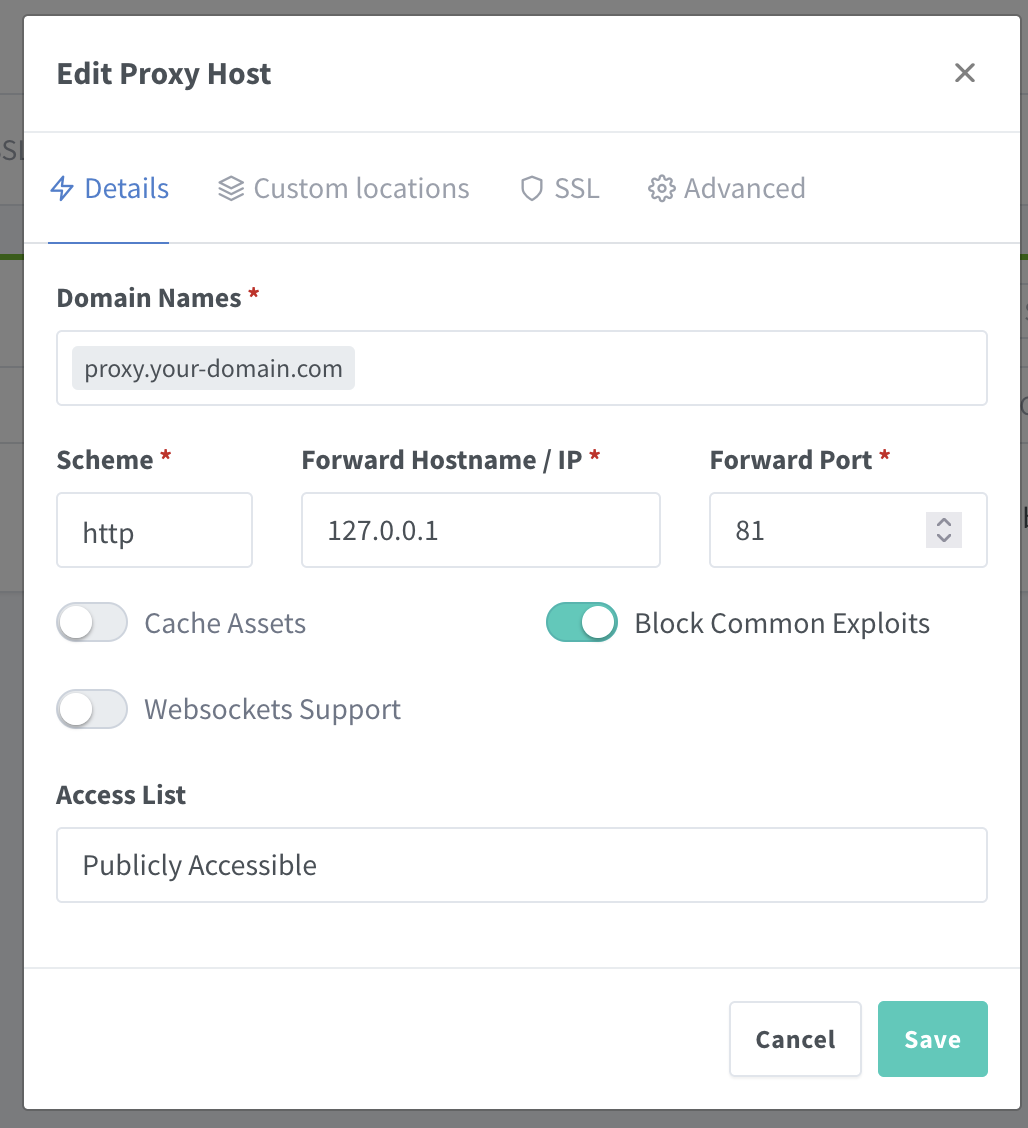
Then you can enter in the form proxy.yourdomain.com, you leave scheme as http (yes, not https!), as hostname you enter 127.0.0.1 and choose Port 81 and switch on "Block Common Exploits" and in the SSL tab you choose "Request a new certificate" and tick "Force SSL", "HTTP/2" and "HSTS enabled".
Kinda like this
|
|
Now you can go and open proxy.yourdomain.com in the browser and you'll have the same thing but protected. Okay, nice.
Secure minio
Within the proxy manager you want to add 2 hosts for minio.
Storage Host: Nearly the same settings as above but this time
Domain=storage.yourdomain.com,hostname=minio,port=9000and also activateWebsocket Support. Also add the following in the Advanced Tab:# Allow special characters in headers ignore_invalid_headers off; # Allow any size file to be uploaded. # Set to a value such as 1000m; to restrict file size to a specific value client_max_body_size 0; # Disable buffering proxy_buffering off; proxy_request_buffering off;(yeah it is normal that when you visit in the browser you get an error)
Dashboard Host: Same as before but
hostname=storage-dashboard.yourdomain.comandport=9090and nothing in the Advanced Tab.
Now you can visit storage-dashboard.yourdomain.com and login with the credentials from what you provided in the docker-compose.yml
Prove that minio is working
Login to minio Dashboard and go to Buckets and create a new bucket mytestbucket. Then go to Object Browser -> mytestbucket and try uploading any file. Worked? Nice!
Get your S3 Credentials from minio for Supabase
Go to Access Keys and click on Create Access Key. Write down both the Access and the Secret Key. You will need it soon.
Take the minio Dashboard offline
Now after setting it up you don't need the Dashboard anymore. You can disable it's public access in your proxy manager by simply clicking disable. You can reactivate it anytime.
2. Setting up the Supabase Server
Create a new Server Instance - do not reuse your S3 server for that (if you have that. If you don't have an S3 Server: you're all set with 1 server instance).
First things first:
Log in to that server and run
git clone --depth 1https://github.com/supabase/supabase.cd supabase/dockercp docker-compose.yml docker-compose.yml.bkp(just so you have a backup file to compare)cp .env.example .env
Secure the Kong API Gateway:
Search for the kong: section in docker-compose.yml and get rid of the ports: in there.
Do not route Supabase Studio (Dashboard) with Kong
Go to docker/volumes/api/kong.yml and scroll down where it says "Protected Dashboard" . Remove that whole part of - dashboard. Yes, everything. We do not want kong to route there.
Add nginx and authelia to Supabase
In your docker-compose.yml go to the top where it says services: . From there want to add 2 additional services: authelia and nginx Proxy Manager.
Please note: If you are fine with protecting Supabase Dashboard with HTTPS + Basic Auth (which is completely fine) then you don't need to add authelia and can also skip all of the authelia setup later as you can simply activate Basic Auth with the Proxy Manager. But if you wanna be more flexible in auth terms, e.g. multi-factor, then authelia is for you!
Adapt the docker-compose.yml file with these 2 additional services:
authelia:
  container_name: authelia
  image: authelia/authelia
  restart: unless-stopped
  expose:
    - 9091
  volumes:
    - ./authelia/config:/config
  environment:
    TZ: 'Europe/Berlin'

nginx:
  image: 'jc21/nginx-proxy-manager:latest'
  restart: unless-stopped
  ports:
    # These ports are in format <host-port>:<container-port>
    - '80:80' # Public HTTP Port
    - '443:443' # Public HTTPS Port
    - '81:81' # Admin Web Port
  volumes:
    - ./nginx-data:/data
    - ./nginx-letsencrypt:/etc/letsencrypt
    - ./nginx-snippets:/snippets:ro
  environment:
    TZ: 'Europe/Berlin'
We will configure authelia later, first we continue with the Supabase Config.
Configure your custom S3
You can skip this if you don't have S3.
Go to docker-compose.yml, search for storage and go to its environment definitions.
environment:
    # ...other definitions
    STORAGE_BACKEND: s3
    GLOBAL_S3_BUCKET: supabase
    GLOBAL_S3_ENDPOINT: https://storage.yourdomain.com
    GLOBAL_S3_PROTOCOL: https
    REGION: eu-south #whatever your region is
    AWS_DEFAULT_REGION: eu-south

    #this next one seems important for minio
    GLOBAL_S3_FORCE_PATH_STYLE: true
    AWS_ACCESS_KEY_ID: your_s3_access_key
    AWS_SECRET_ACCESS_KEY: your_secret_s3_access_key
If you do not use S3
You might (or not) want to change the path where files are stored. See volumes: section in docker-compose.yml -> storage.volumes
Configure Credentials:
Go to your .env file.
Set
POSTGRES_PASSWORD=some-very-complicated-database-passwordGenerate and set random
JWT_SECRET=...withnode -e "console.log(require('crypto').randomBytes(32).toString('hex'))"Us the self-hosting Guide on supabase.com (https://supabase.com/docs/guides/self-hosting/docker#generate-api-keys) to generate
ANON_KEY=andSERVICE_ROLE_KEY=with yourJWT_SECRETand set both in your.envMake sure to also set proper keys for
LOGFLARE_LOGGER_BACKEND_API_KEY=andLOGFLARE_API_KEY=(I think they are the same but if anyone else from the Supabase Team or so knows better: Tell me)
Configure Studio and API:
Go to your .env file again.
Set
API_EXTERNAL_URL=your-api.yourdomain.comto whatever you want it to be. This is where all Supabase API requests can and will be sent.Set
SUPABASE_PUBLIC_URL=your-api.yourdomain.comto wherever you want to access the Dashboard.
Configure your Page:
As always you'll have an app using Supabase. Now that app is running somewhere. And that somewhere we need to configure. Upfront: You can change that later by simply adapting the env variables and restarting the container (see Section 6).
SITE_URL=https://yourapp.com

# use whatever additional urls you need
ADDITIONAL_REDIRECT_URLS=http://localhost:3000,http://localhost:6000
Configure Postgres Access
If you want to access the Database directly, from the outside, then you simply have to remove the 127.0.0.1 from the docker-compose-yml -> db.ports: section
Configure E-Mail:
I won't cover this in detail as it's not helpful for this specific guide and not required. Simply search for email or SMTP in the .env file. You don't even need to configure that, not even in production - if you are anyways generating mails on your own (which most production sites do).
3. Starting the Supabase + nginx Server
Since we did the whole configuration part already and since we removed Supabases default security holes we can now start all containers:
docker compose pulldocker compose up -d
Wait for all containers to have started and check if everything is running fine with docker ps -> if any of the containers says something like Restarted X Seconds ago it is most likely that there's some failure happening. Unusual with my setup though 🫶🏾.
4. Make it run!
The containers are running but Supabase isn't accessible - yet. However, our nginx proxy is!
Protect the Proxy with itself first, see Section 3.2 where this was already explained including the initial credentials
Now go to your protected proxy on e.g.
supabase-proxy.yourdomain.comSetup the API Proxy: Add a new proxy with
your-api.your domain.com,scheme=http,hostname=kong,port=8000. Activate Websocket Support and in the SSL Tab request new certificate and activate all checkboxesSetup the Dashboard Proxy:
Same as API Proxy but with
studio.yourdomain.comand this time usehostname=studio,port=3000.Since Studio accesses the storage and auth service directly we need
to go to the Custom Locations and(Update: Don't do this in Custom Locations Tab as this will not forward everything we need) make sure that the path/storageand/authis forwarded tohostname=kongandport=8000instead and we also need to make sure that Authorization (if later enabled) is always passed downwards.How? Easy: Go to Advanced Tab and configure this:
 location / {
   proxy_set_header  Authorization $http_authorization;
   proxy_pass_header Authorization;
   proxy_pass $forward_scheme://studio:3000;
 }

 location /storage {
   proxy_set_header  Authorization $http_authorization;
   proxy_pass_header Authorization;
   proxy_pass $forward_scheme://kong:8000;
 }

 location /auth {
   proxy_set_header  Authorization $http_authorization;
   proxy_pass_header Authorization;
   proxy_pass $forward_scheme://kong:8000;
}
3. When both done: Save it.
Now your Supabase Studio should be publicly accessible under studio.yourdomain.com / without Protection though - yet.
Basic Auth
As stated above, you can simply use Basic Auth now and later on upgrade to some more sophisticated stuff like authelia (no issue in upgrading later). To do that, go to Access Lists in the proxy manager, create a new one, give it any name, check Satisfy Any, go to Authorization Tab and enter the username/password combo you'd like.
Now go to your Proxy Host studio... and click edit and select your created Access List there. Save it.
When you now visit studio.yourdomain.com it will be protected and ask for username/pass.
Just a sidenote: You could stop at this point
Like, for real. You are having a full-fledged self-hosted setup already. Felt complex, wasn't all too complex in the end, was it?

5. More than Basic Auth: Authelia
Authelia is another Layer running in between nginx to protect specific routes with Authentication - and Authelia can do Multi-Factor, if you want that.
This isn't extremely intuitive, but rather unusually complex. However only if you don't know how to do that. Now since I've put in all the work of researching you can just simply copy and paste. So yeah, I've done it for you.
We want to get rid of our Basic Authentication for Supabase Studio and instead have a nice-looking login screen.
We already installed authelia as part of our Stack (check the docker-compose.yml above) 😎. So we only need to configure it now.
5.1 Adapt the Default Configuration
Open up the file authelia/config/configuration.yml and if you want, you can empty it because we will only use a small portion of it to get started (you can dig deeper into the config in their documentation).
This is my initial config to get started (search for yourdomain.com to see the things you have to change and please also go through it for changing secrets before you actually go to production):
## The theme to display: light, dark, grey, auto.
theme: light

## The secret used to generate JWT tokens when validating user identity by email confirmation. JWT Secret can also be
## set using a secret: https://www.authelia.com/c/secrets
jwt_secret: a_very_important_secret

default_redirection_url: https://google.com # confusing haxxors
default_2fa_method: ""

server:
  host: 0.0.0.0
  port: 9091
  path: ""
  enable_pprof: false
  enable_expvars: false
  disable_healthcheck: false
  read_buffer_size: 4096
  write_buffer_size: 4096

  ## Server headers configuration/customization.
  headers:
    ## The CSP Template. Read the docs.
    csp_template: ""

  ## Authelia by default doesn't accept TLS communication on the server port. This section overrides this behaviour.
  tls:
    key: ""
    certificate: ""
    client_certificates: []

log:
  level: debug

totp:
  issuer: yourdomain.com #your authelia top-level domain
  period: 30
  digits: 6
  algorithm: sha1
  skew: 1

authentication_backend:
  file:
    path: /config/users_database.yml
    watch: false
    search:
      email: false
      case_insensitive: false
    password:
      algorithm: argon2
      argon2:
        variant: argon2id
        iterations: 3
        memory: 65536
        parallelism: 4
        key_length: 32
        salt_length: 16
  ## Password Reset Options.
  password_reset:
    ## Disable both the HTML element and the API for reset password functionality.
    disable: false
    ## External reset password url that redirects the user to an external reset portal. This disables the internal reset
    ## functionality.
    custom_url: ""
  refresh_interval: 5m


password_policy:
  ## The standard policy allows you to tune individual settings manually.
  standard:
    enabled: false
    min_length: 8
    max_length: 0
    require_uppercase: true
    require_lowercase: true
    require_number: true
    require_special: true

  ## zxcvbn is a well known and used password strength algorithm. It does not have tunable settings.
  zxcvbn:
    enabled: false
    min_score: 3


access_control:
  ## Default policy can either be 'bypass', 'one_factor', 'two_factor' or 'deny'. It is the policy applied to any
  ## resource if there is no policy to be applied to the user.
  default_policy: deny
  rules:
    - domain:
        - "auth.yourdomain.com"
      policy: bypass
    - domain: "studio.yourdomain.com"
      policy: one_factor

session:
  ## The name of the session cookie.
  name: authelia_session
  domain: yourdomain.com
  ## https://www.authelia.com/c/session#same_site
  same_site: lax

  ## The secret to encrypt the session data.
  ## This is only used with Redis / Redis Sentinel.
  secret: insecure_session_secret
  ## The time before the cookie expires and the session is destroyed if remember me IS NOT selected.
  expiration: 1h
  ## The inactivity time before the session is reset. If expiration is set to 1h, and this is set to 5m, if the user
  ## does not select the remember me option their session will get destroyed after 1h, or after 5m since the last time
  ## Authelia detected user activity.
  inactivity: 5m
  ## The time before the cookie expires and the session is destroyed if remember me IS selected.
  ## Value of -1 disables remember me.
  remember_me_duration: 1M

# security measures against hackers
regulation:
  max_retries: 3
  find_time: 2m
  ban_time: 30m

storage:
  encryption_key: a_very_important_secret
  local:
    path: /config/db.sqlite3

notifier:
  disable_startup_check: false
  ## File System (Notification Provider)
  filesystem:
    filename: /config/notification.txt
Restart authelia with docker compose stop authelia and docker compose up -d --force-recreate authelia .
5.2 Configure your users:
In the authelia/config folder you should find now a users_database.yml file.
Open it and you'll find a username (authelia) with a password (also authelia but encrypted with argon2). So if you want to change it, you need to replace those in that file and restart authelia container again. I'll leave it for now with username=authelia/pw=authelia .
5.3 Configure reusable snippets
On your actual server you should see ./nginx-data folder as well as ./nginx-letsencrypt folder in your supabase/docker directory. Now create a new directory next to those with the name nginx-snippets .
Now in this directory you create 2 files (note that in the second file we use auth.yourdomain.com which must be whatever you wanna use):
nginx-snippets/authelia-location.conf
# File: nginx-snippets/authelia-location.conf

set $upstream_authelia http://authelia:9091/api/verify;

## Virtual endpoint created by nginx to forward auth requests.
location /authelia {
    ## Essential Proxy Configuration
    internal;
    proxy_pass $upstream_authelia;

    ## Headers
    ## The headers starting with X-* are required.
    proxy_set_header X-Original-URL $scheme://$http_host$request_uri;
    proxy_set_header X-Original-Method $request_method;
    proxy_set_header X-Forwarded-Method $request_method;
    proxy_set_header X-Forwarded-Proto $scheme;
    proxy_set_header X-Forwarded-Host $http_host;
    proxy_set_header X-Forwarded-Uri $request_uri;
    proxy_set_header X-Forwarded-For $remote_addr;
    proxy_set_header Content-Length "";
    proxy_set_header Connection "";

    ## Basic Proxy Configuration
    proxy_pass_request_body off;
    proxy_next_upstream error timeout invalid_header http_500 http_502 http_503; # Timeout if the real server is dead
    proxy_redirect http:// $scheme://;
    proxy_http_version 1.1;
    proxy_cache_bypass $cookie_session;
    proxy_no_cache $cookie_session;
    proxy_buffers 4 32k;
    client_body_buffer_size 128k;

    ## Advanced Proxy Configuration
    send_timeout 5m;
    proxy_read_timeout 240;
    proxy_send_timeout 240;
    proxy_connect_timeout 240;
}
nginx-snippets/authelia-authrequest.conf
# File: nginx-snippets/authelia-authrequest.conf

## Send a subrequest to Authelia to verify if the user is authenticated and has permission to access the resource.
auth_request /authelia;

## Set the $target_url variable based on the original request.

## Comment this line if you're using nginx without the http_set_misc module.
set_escape_uri $target_url $scheme://$http_host$request_uri;

## Uncomment this line if you're using NGINX without the http_set_misc module.
# set $target_url $scheme://$http_host$request_uri;

## Save the upstream response headers from Authelia to variables.
auth_request_set $user $upstream_http_remote_user;
auth_request_set $groups $upstream_http_remote_groups;
auth_request_set $name $upstream_http_remote_name;
auth_request_set $email $upstream_http_remote_email;

## Inject the response headers from the variables into the request made to the backend.
proxy_set_header Remote-User $user;
proxy_set_header Remote-Groups $groups;
proxy_set_header Remote-Name $name;
proxy_set_header Remote-Email $email;

## If the subreqest returns 200 pass to the backend, if the subrequest returns 401 redirect to the portal.
error_page 401 =302 https://auth.yourdomain.com/?rd=$target_url;
nginx-snippets/proxy.conf
## Headers
proxy_set_header Host $host;
proxy_set_header X-Original-URL $scheme://$http_host$request_uri;
proxy_set_header X-Forwarded-Proto $scheme;
proxy_set_header X-Forwarded-Host $http_host;
proxy_set_header X-Forwarded-Uri $request_uri;
proxy_set_header X-Forwarded-Ssl on;
proxy_set_header X-Forwarded-For $remote_addr;
proxy_set_header X-Real-IP $remote_addr;
proxy_set_header Connection "";

## Basic Proxy Configuration
client_body_buffer_size 128k;
proxy_next_upstream error timeout invalid_header http_500 http_502 http_503; ## Timeout if the real server is dead.
proxy_redirect  http://  $scheme://;
proxy_http_version 1.1;
proxy_cache_bypass $cookie_session;
proxy_no_cache $cookie_session;
proxy_buffers 64 256k;

## Trusted Proxies Configuration
# The next line is very much recommended for security reasons!
# It works without the line but this would reduce security.
# So what is it and WHICH ip to set here?
# Basically you wanna set here the subnet your docker network is using here.
# The default subnet is 172.17.0.0/16 HOWEVER in my case
# this isn't true and probably for you as well:
# Check the ip-adress of your container with docker inspect container_id
# all of your containers in this stack probably
# have something like 172.x.x.x
# now basically put 2 zeros at the end and /16 and you have your subnet.
# in my case that was one container with '172.20.0.11'
# so it is 172.20.0.0/16
# ------
# set_real_ip_from 172.17.0.0/16;
real_ip_header X-Forwarded-For;
real_ip_recursive on;

## Advanced Proxy Configuration
send_timeout 5m;
proxy_read_timeout 360;
proxy_send_timeout 360;
proxy_connect_timeout 360;
When you have added those snippets then do docker compose stop authelia && docker compose up -d --force-recreate authelia .
5.4 Setup the Auth Portal
Go to your proxy manager web interface and add a new proxy host. This time hostname=authelia and port=9091. Activate "Block Common Exploits" and "Websockets Support", activate all Checkboxes in SSL Tab. Then go to "Advanced" Tab and add this:
location / {
    include /snippets/proxy.conf;
    proxy_pass $forward_scheme://$server:$port;
}
Done. You should be able to test it with your username/password (authelia/authelia if you haven't changed it yet.)
5.5 Setup Studio to use Authelia
Edit your Supabase Studio Proxy Host and remove Basic Auth by choosing "Publicly Accessible" in the Access List (you can also leave it on but I haven't tried if double protection brings problems). Go to the advanced tab and add this:
include /snippets/authelia-location.conf;

location / {
    include /snippets/proxy.conf;
    include /snippets/authelia-authrequest.conf;
    proxy_pass $forward_scheme://$server:$port;
}

location /storage {
    include /snippets/proxy.conf;
    include /snippets/authelia-authrequest.conf;
    proxy_pass $forward_scheme://kong:8000;
}

location /auth {
    include /snippets/proxy.conf;
    include /snippets/authelia-authrequest.conf;
    proxy_pass $forward_scheme://kong:8000;
}
Done. Save it, load Studio and now Authelia protects your Studio. 🎉🤩
6. Changing configuration in a running environment
Sometimes you need to just update values, such as when you e.g. updated the Postgres password or needed to change some url config. In that case you can bring the containers down with docker compose down (no worries, since we are using volumes, all data is kept) and then you can do docker compose up -d again loading the updated config.
If you liked that, consider buying me a coffee ❤️ ko-fi.com/activenode